
Master Your Driver: The Ultimate Guide to the Proper Golf Stance and Grip for Driving the Ball Straight
There’s no feeling in golf quite like it: the sound of a perfectly struck drive, the sight of the ball soaring high and straight down the middle of the fairway. It’s the shot that sets up birdies and builds confidence. But for many amateur golfers, the driver can be a source of immense frustration, leading to wild slices, frustrating hooks, and lost balls.
If that sounds familiar, I’ve got good news for you. In my years of playing and coaching, I’ve found that over 80% of issues off the tee don’t stem from a complex swing flaw, but from a poor foundation. The secret to unlocking consistent, powerful drives lies in mastering two fundamental elements before you even start your swing: your grip and your stance.
This comprehensive guide will walk you through everything you need to know to build a repeatable, powerful, and accurate setup. We’ll cover the proper golf stance and grip for driving the ball straight, turning your biggest weakness into your greatest strength.
Driver Setup Checklist: Keys to a Straighter Shot
Pressed for time? Here’s a quick summary of the essentials for a perfect driver setup:
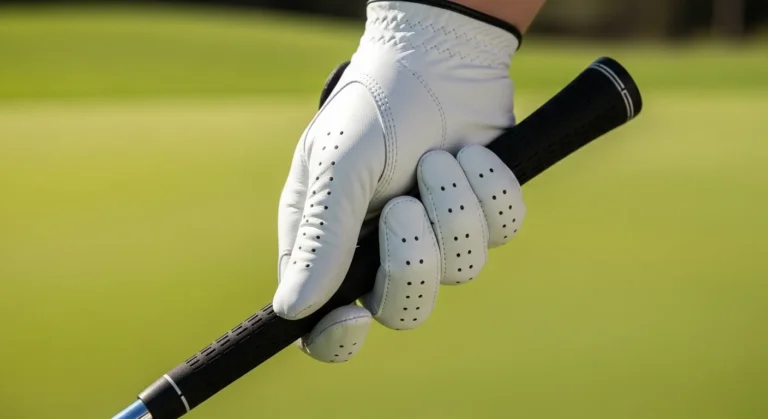
- The Grip is Your Control Center: A neutral grip is key. Your lead hand’s “V” (between thumb and index finger) should point to your trail shoulder. The trail hand’s “V” should mirror it.
- Grip Pressure Matters: Hold the club like you’d hold a small bird—firm enough so it doesn’t fly away, but gentle enough not to crush it. A 4 or 5 out of 10 is perfect.
- Build an Athletic Stance: Set your feet slightly wider than shoulder-width for stability. Flare your lead foot out about 20-30 degrees to help your hips rotate through the shot.
- Ball Position is Non-Negotiable: For the driver, always position the ball just off the inside of your lead heel. This helps you hit the ball on the upswing for maximum distance.
- Posture and Tilt: Hinge at your hips, not your waist, and create a slight spine tilt away from the target. This promotes a powerful, sweeping swing path.
The Foundation: Why a Proper Golf Grip is Crucial for Driving Straight
Think of your grip as the steering wheel of your golf swing. It’s your only connection to the club, and how you hold it directly influences the clubface angle at impact. An improper grip is the root cause of slices (a weak grip where the hands are rotated too far away from the target) and hooks (a strong grip where the hands are rotated too far towards the target).
Our goal is to build a neutral grip, which gives you the best chance to deliver a square clubface to the ball, shot after shot.
Choosing Your Grip Style: Interlock, Overlap, or 10-Finger?
There are three common ways to connect your hands on the club. There’s no single “best” one; it’s about what feels most comfortable and secure for you.
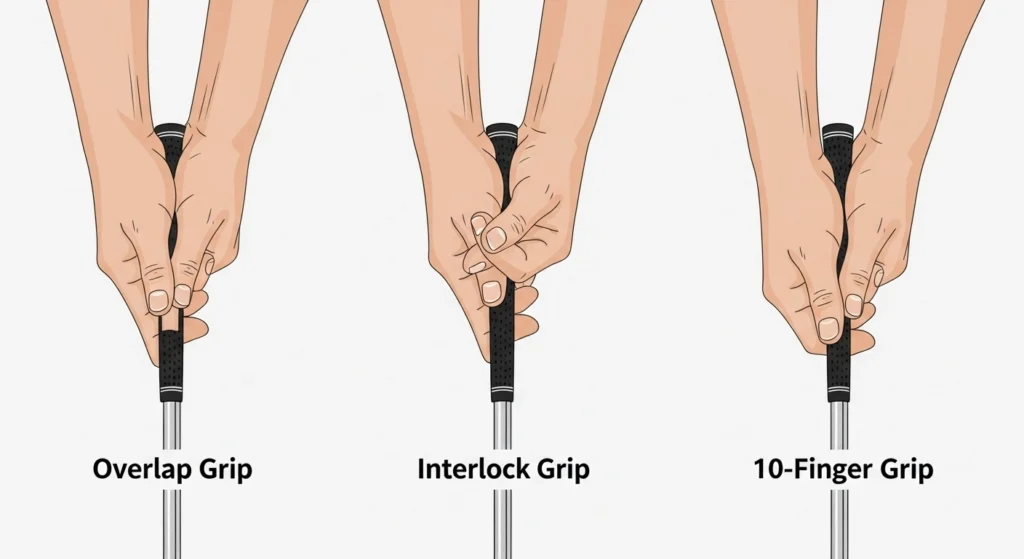
- Overlap (Vardon) Grip: This is the most popular grip on professional tours. The pinky finger of your trail hand rests on top of the index finger of your lead hand. It promotes great hand unity and control.
- Interlock Grip: Famous players like Jack Nicklaus and Tiger Woods use this style. The pinky finger of your trail hand links, or interlocks, with the index finger of your lead hand. It’s excellent for players with smaller hands as it can make the club feel more secure.
- 10-Finger (Baseball) Grip: All ten fingers are on the club, with the pinky of the trail hand pressed against the index finger of the lead hand. This is often recommended for beginners, seniors, or players who lack wrist strength, as it can help generate more clubhead speed.
Pro Tip: Experiment with all three at the driving range. What I’ve found works best is to pick the one that feels most natural and allows you to swing without thinking about your hands.
A Step-by-Step Guide to the Perfect Neutral Golf Grip
Let’s build that perfect, neutral grip from scratch.
- Set Your Lead Hand (Left Hand for Right-Handed Golfers): Hold the club out in front of you with your right hand. Place the grip diagonally across the fingers of your left hand, from the base of your pinky to the middle joint of your index finger. Close your hand. You should see 2 to 2.5 knuckles on your left hand when you look down.
- Check the “V”: The “V” formed by your thumb and index finger on your left hand should point towards your right shoulder. This is a critical checkpoint for a neutral grip.
- Set Your Trail Hand (Right Hand for Right-Handed Golfers): Now, bring your right hand to the club. The club should rest primarily in your fingers. Cover your left thumb with the lifeline of your right palm.
- Check the Second “V”: The “V” formed by your right thumb and index finger should point in the same direction as your left “V”—towards your right shoulder. When your hands work together like this, it’s much easier to square the clubface at impact.
A great way to practice this is with a molded grip trainer. [The SKLZ Grip Trainer] is an excellent tool that snaps onto your own clubs and forces your hands into the correct position, building muscle memory.
Mastering the Proper Golf Stance for Power and Accuracy
Once your hands are set, it’s time to build a stable and athletic base. Your stance is your engine; it’s where power is generated and balance is maintained. A poor stance can rob you of distance and lead to inconsistent strikes.
Nailing Your Foot Position and Width
For the driver, you need stability.
- Stance Width: Position your feet so they are slightly wider than your shoulders. A good rule of thumb is to have the inside of your heels line up with the outside of your shoulders. This wide base provides the stability needed to support a powerful, high-speed swing.
- Foot Flare: Your back foot should be mostly square to the target line. However, I highly recommend flaring your lead foot (left foot for right-handers) about 20-30 degrees towards the target. This simple adjustment opens up your hips, making it significantly easier to rotate through the ball and generate effortless power.
Perfecting Your Posture and Ball Position for Driving
This is where so many golfers go wrong. The driver is the only club you want to hit on the upswing, and your posture and ball position are what make that possible.
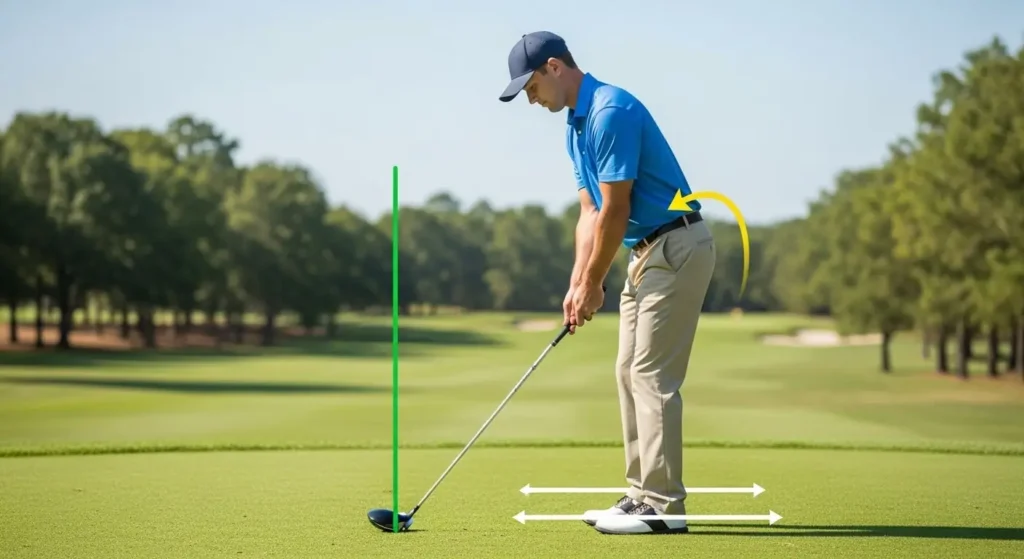
- Ball Position: This is critical. Place the ball directly in line with the inside of your lead heel. To check this, take your stance and then place your driver up against the ball, running the shaft straight back to your feet. It should touch the inside of your lead foot’s heel.
- Athletic Posture: Stand tall, then hinge forward from your hips, not your waist. Keep your back relatively straight and let your arms hang down naturally. You should feel balanced, with your weight on the balls of your feet.
- Spine Tilt: Because your right hand is lower than your left on the grip, your right shoulder should naturally sit lower than your left. This creates a slight spine tilt away from the target. From a face-on view, your spine should be tilted slightly to the right. This is the secret to launching the ball high and far.
Using alignment sticks can be a game-changer for practicing your stance and ball position. [A set of Golf Alignment Sticks] can be placed on the ground to give you visual feedback on your foot line and ball position, ensuring you’re setting up perfectly every time.
Putting It All Together: A Pre-Shot Routine for the Proper Golf Stance and Grip
The best golfers in the world have one thing in common: a consistent pre-shot routine. It’s the glue that holds these fundamentals together under pressure.
Here’s a simple routine to try:
- Stand Behind the Ball: Pick a specific target in the distance (like a tree or a bunker) and an intermediate target a few feet in front of your ball on the same line.
- Take Your Grip: Form your neutral grip while standing behind the ball. This allows you to set your hands correctly without feeling rushed.
- Approach and Aim: Walk to the side of the ball and aim the clubface at your intermediate target.
- Build Your Stance: Set your lead foot, then your trail foot, creating that wide, stable base. Ensure the ball is aligned with your lead heel.
- Final Checks: Settle into your athletic posture, ensure your spine is tilted away from the target, give the club a little waggle to release tension, look at your target one last time, and swing.
This routine ensures you check off all the key elements—grip, aim, stance, ball position, and posture—on every single shot. As you become more consistent with your setup, you’ll be amazed at how your driving improves. You might also want to check if you’re using the right equipment for your swing. [A Guide on Choosing the Right Golf Balls] can make a huge difference.
Common Mistakes to Avoid When Driving the Ball
- Grip Pressure: A death grip (10/10 pressure) creates tension in your arms and shoulders, restricting your swing and killing your speed. Remember the bird analogy!
- Stance Too Narrow: A narrow stance is unstable and will cause you to lose balance during your swing, leading to off-center hits.
- Ball Too Far Back: Playing the ball in the middle or back of your stance with a driver is a recipe for a steep, downward swing, resulting in pop-ups or a nasty slice. For more on fixing that dreaded slice, check out our guide. [How to Stop Slicing Your Driver in 3 Simple Steps].
- Level Shoulders: Setting up with your shoulders level encourages a steep, over-the-top swing. Ensure your trail shoulder is lower to promote a powerful in-to-out swing path. For a deeper dive into equipment setup, read [The Ultimate Guide to Golf Driver Loft and Adjustments].
Frequently Asked Questions (FAQ)
You should hold the club with light to medium pressure, about a 4 or 5 on a scale of 1 to 10. Too much pressure creates tension and restricts your ability to generate clubhead speed. It’s one of the most common faults I see in amateur golfers.
The ball should be positioned just off the inside of your lead heel (your left heel for a right-handed player). This forward position allows you to strike the ball on the upswing, which is optimal for maximizing distance and launch angle.
No, your trail shoulder should be slightly lower than your lead shoulder at address. This happens naturally because your trail hand is lower on the club. This tilt helps you stay behind the ball and promotes the ideal upward angle of attack with the driver. For more on the fundamentals, the PGA of America’s guide on fundamentals is an excellent resource.
You should stand far enough away that your arms can hang down naturally from your shoulders. There should be about a hand’s width (4-6 inches) between the butt end of the club and your body. If you’re reaching for the ball or feel cramped, your distance is incorrect.
Finalizing Your Setup: The Key to a Straighter Drive
Mastering the proper golf stance and grip for driving the ball straight is the single most effective thing you can do to improve your consistency and confidence off the tee. It might not be as glamorous as trying a new swing theory, but a solid foundation is what separates good players from great ones.
Take these fundamentals to the practice range. Be patient and deliberate. Film yourself or use a mirror to check your positions. By making a perfect setup an automatic habit, you’ll free yourself up to make a confident, athletic swing that sends the ball flying exactly where you want it to go.
Now it’s your turn. Give these tips a try during your next range session. I’d love to hear how they work for you—leave a comment below with your results!