

How to Hit a Basic Chip Shot: Your Ultimate 5-Step Guide to Getting on the Green
There’s nothing more frustrating in golf than being just off the green, only to duff, thin, or skull a simple chip shot and waste a stroke. We’ve all been there. A great drive and a solid approach shot can be completely undone by a poor short game. But what if I told you that one of the most reliable, score-saving shots in golf is also one of the easiest to learn?
In my experience, mastering the basic chip shot is the fastest way for amateur golfers to shave strokes off their handicap. It’s not about power or fancy technique; it’s about control, consistency, and confidence. This guide will break down exactly how to hit a basic chip shot onto the green, turning a moment of fear into an opportunity to score. We’ll cover everything from club selection to a simple, repeatable swing that will have you cozying the ball up to the pin in no time.
Key Takeaways: The Perfect Chip Shot in 30 Seconds
For those who want a quick summary, here’s the blueprint for a perfect basic chip shot:
- Club Choice: Use a pitching wedge or an 8-iron for a standard chip.
- Stance: Feet close together, with the ball positioned off the inside of your back foot.
- Weight Distribution: Lean about 60-70% of your weight onto your front foot.
- Hands Position: Press your hands slightly forward, ahead of the golf ball.
- The Swing: Use a simple putting-style stroke. Keep your wrists firm and rock your shoulders like a pendulum. Let the club do the work.
Understanding the Basic Chip Shot: When and Why to Use It
Before we dive into the “how,” let’s quickly cover the “when” and “why.” The basic chip shot, often called a “bump and run,” is your go-to shot when you are just off the green (usually within a few yards) and have no major obstacles like bunkers or thick rough between you and the hole.
The goal is simple: get the ball onto the putting surface as quickly as possible and let it roll out towards the pin like a putt. It’s a low-risk, high-reward shot that emphasizes control over power, a fundamental concept backed by trusted sources like the PGA of America.
- Use a chip shot when: You are close to the green with a clear path.
- Avoid a chip shot when: You need to carry the ball over a hazard or stop it very quickly. (That’s a job for a pitch shot or a flop shot).
Choosing the Right Club for Your Chip Shot
Your club selection is crucial. While you can technically chip with any club, the most common choices for a basic chip shot are your pitching wedge (PW), 9-iron, or 8-iron.
Here’s a simple way to think about it:
- Pitching Wedge: Use this when you have more airtime and less green to work with. It will produce a slightly higher trajectory with a bit more spin.
- 9-Iron: A great all-around choice. It offers a good balance of flight and roll.
- 8-Iron: My personal favorite for most basic chips. Use this when you have plenty of green between you and the hole. The ball will come out lower, hit the green sooner, and roll out more.
Pro Tip: Don’t be afraid to experiment! The key is to use the same simple technique but change the club to alter the outcome. This is far easier than trying to change your swing for every shot. For a deeper dive into club options, check out our A Guide on Choosing the Right Golf Wedge.

How to Hit a Basic Chip Shot: The 5-Step Technique
This is the core of the lesson. Forget complicated swing thoughts. We are going to build a simple, repeatable motion from the ground up.
Step 1: The Setup – Building Your Foundation
Your setup dictates the success of your chip shot. Get this right, and you’re halfway there.
- Narrow Your Stance: Stand with your feet much closer together than you would for a full swing. A gap of just a few inches between your heels is perfect.
- Open Your Stance Slightly: Aim your feet and hips slightly to the left of your target (for a right-handed golfer). This helps clear your body through the shot and promotes a descending blow.
- Get Closer to the Ball: Stand a little closer to the ball than you normally would. This will encourage you to stand the club up more on its toe, helping the club glide through the turf instead of digging.
Step 2: Ball Position – The Key to Crisp Contact
This is a non-negotiable step for a clean chip.
- Position the ball off the inside of your back foot. For a right-handed player, this means aligning it with the inside of your right foot.
This back-foot position ensures you strike the ball on a downward arc, hitting the ball first and then the turf. This is the secret to that crisp “click” sound and eliminating fat or thin shots.
Step 3: The Grip – A Lighter Touch
How you hold the club matters, even on this small shot.
- Choke Down: Grip down on the club by an inch or two. This gives you significantly more control and feel.
- Use Your Putting Grip: Many players, including myself, find that using their putting grip (or a variation of it) helps keep the hands and wrists quiet during the swing.
- Grip Pressure: Hold the club with a light pressure, maybe a 4 out of 10. A death grip creates tension and leads to jerky movements.
Step 4: The Swing – A Simple Pendulum Motion
Here’s where it all comes together. The chipping swing is not a mini full swing; it’s a completely different motion.
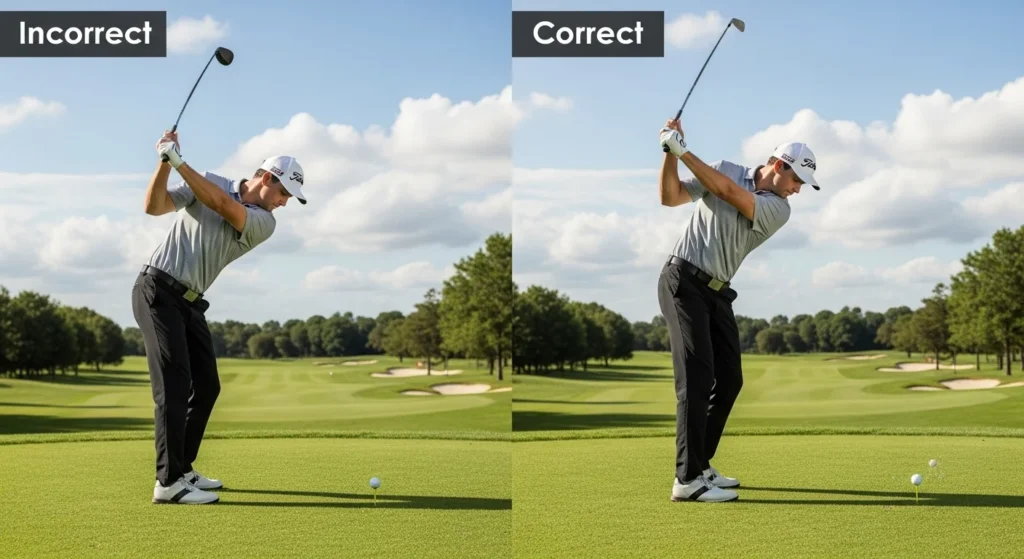
- Lock Your Wrists: From the start, press your hands slightly forward so the club shaft is leaning towards the target. Maintain this angle throughout the entire swing. Do not break or flick your wrists.
- Rock Your Shoulders: The swing itself should come from your shoulders. Imagine a triangle formed by your arms and shoulders. Your goal is to simply rock this triangle back and forth.
- Think “Pendulum”: The motion should feel like a grandfather clock’s pendulum—smooth and rhythmic. The length of your backswing directly controls the distance. For a 15-yard chip, you might only take the club back to your knee.
Step 5: The Follow-Through – Keep it Short and Sweet
The follow-through is just as important as the backswing.
- Accelerate Through the Ball: Make sure you make a positive, committed stroke. Decelerating is a major cause of poor chip shots.
- Keep the Triangle Intact: Your arms and shoulders should finish the motion together, with the clubhead low to the ground and pointing at the target.
- Short Finish: Your follow-through should be roughly the same length as your backswing.
Once the ball is on the green and rolling, you’ve done your job! Now it’s time to focus on the next step: How to Read Green and Sink More Putts.
Common Chipping Mistakes (And How to Fix Them)
Even with a simple technique, bad habits can creep in. Here are the two most common flaws I see every day.
- The Wrist Flick/Scoop: This is the #1 killer of good chipping. Golfers try to “help” the ball into the air by flicking their wrists at impact.
- The Fix: Focus on keeping your hands ahead of the clubhead through impact. The “rock the shoulders” thought is the best antidote to this.
- Using Too Much Body: Some players try to turn their hips and body like a full swing. This introduces too many variables and inconsistencies.
- The Fix: Keep your lower body quiet. Your legs and hips should remain almost completely still. The motion is all in your arms and shoulders.
Drills to Master Your Chipping Technique
To truly own this shot, you need to practice it. Here are two simple drills you can do.
- The Towel Drill: Lay a towel on the green about 5-10 feet from the edge. From just off the green, your goal is to land your chip shots on the towel. This drill is fantastic for teaching you distance control and how to visualize your landing spot.
- The Gate Drill: Place two tees on the ground, just wider than your clubhead, a few inches behind the ball. Practice hitting chips without striking the tees. This drill forces you to have a consistent, straight-back-and-through club path.
If you can’t always get to the course, a backyard chipping net like the GoSports Chipster Golf Chipping Net (available on Amazon) is an amazing tool for practicing these fundamentals at home.

Frequently Asked Questions About Chipping (FAQ)
A chip shot is a low-flying shot with minimal airtime and maximum roll, used when you are very close to the green. A pitch shot is a higher-flying shot with more airtime and less roll, used when you need to carry the ball over an obstacle or from further away.
Distance is controlled primarily by two factors: club selection and the length of your backswing. For longer chips, you can either take a less lofted club (like an 8-iron) or lengthen your backswing slightly. Never try to control distance by swinging harder or faster.
This is almost always caused by incorrect ball position or excess body movement. Ensure the ball is back in your stance and that your weight is firmly on your front foot. This promotes a downward strike, preventing the club from hitting the ground early (fat) or catching the ball on the upswing (thin).
Absolutely! If the fringe is tightly mown, using a “Texas wedge” (your putter) is often the safest play. Some players also find success chipping with a hybrid, using the exact same technique described above. For more on this, it’s important to understand Understanding Golf Etiquette on the Green to ensure you’re not damaging the surface.
Mastering the Basic Chip Shot: Your Key to a Better Short Game
Mastering how to hit a basic chip shot onto the green is a game-changer. It replaces guesswork with a reliable system, builds confidence, and directly translates to lower scores. Remember the key principles: narrow stance, ball back, weight forward, hands ahead, and rock your shoulders.
By focusing on this simple, repeatable motion, you’ll eliminate those frustrating wasted strokes around the green. Now, it’s time to take this knowledge to the practice area or the course.
What’s your biggest struggle with chipping? Try this technique and leave a comment below letting us know how it worked for you!