

How to Fix a Slice With a Driver: A Simple 5-Step Guide for Beginners
That feeling… you step up to the tee, full of confidence. You take a mighty swing with your driver, only to look up and see your golf ball curving wildly to the right, landing in the trees or the next fairway over. If you’re a right-handed golfer, this is the dreaded slice, and trust me, you’re not alone.
In my experience coaching hundreds of new golfers, the slice is the single most common and frustrating problem for beginners. But here’s the good news: it’s completely fixable. It’s not some mystery you have to live with; it’s a simple case of physics, and once you understand the cause, you can implement the cure.
This guide will walk you through everything you need to know. We’ll break down why you’re slicing the ball and provide simple, actionable steps and drills to straighten out your drives for good.
4 Quick Fixes for Your Driver Slice (Key Takeaways)
For those who want the quick summary, here are the core principles to fixing your slice:
- Strengthen Your Grip: Your hands are your only connection to the club. A “weak” grip is a top slice culprit. We’ll show you how to adjust it.
- Fix Your Alignment & Stance: Your body might be aimed in one direction while your club is aimed in another. Proper alignment is crucial for a straight shot.
- Correct Your Swing Path: Most slicers swing “out-to-in,” cutting across the ball. The goal is to swing “in-to-out,” promoting a straight flight or a gentle draw.
- Control the Clubface: An open clubface at impact is the direct cause of slice spin. The grip and swing path changes we’ll discuss will help you square it up naturally.
Understanding Why You Slice: The Root Causes of a Bad Slice with Your Driver
Before we can fix the problem, we need to understand what’s actually happening. At its core, a slice is caused by one main thing: an open clubface in relation to your swing path at the moment of impact.
Think of it like this: when the face of your driver is pointing to the right of the direction you’re swinging (for a right-hander), it puts a clockwise spin on the ball. This side-spin is what makes the ball curve dramatically from left to right.
Let’s break down the two key components that lead to this.
The “Out-to-In” Swing Path Explained
This is the most common swing flaw for beginner golfers. An out-to-in path means that during your downswing, the club head is moving from outside the target line to inside the target line as it strikes the ball.
Imagine a line pointing from your ball to your target. With an out-to-in swing, your club cuts across this line from right to left. When you combine this path with an open clubface, you get that weak, curving slice.
The Dreaded Open Clubface
Even with a perfect swing path, you’ll still slice it if your clubface is open (pointing right of the target) at impact. For many beginners, this happens because of an improper grip or a failure to rotate the hands and club through the ball.
What I’ve found works best is focusing on the grip first, as a proper grip often helps the clubface square up automatically without you even having to think about it.
Your Step-by-Step Guide: How to Fix a Bad Slice with Your Driver for Beginners
Ready to get to work? These are the exact steps I use to help beginners straighten out their drives. We’ll start with the setup—because a great shot begins before you even start your swing.
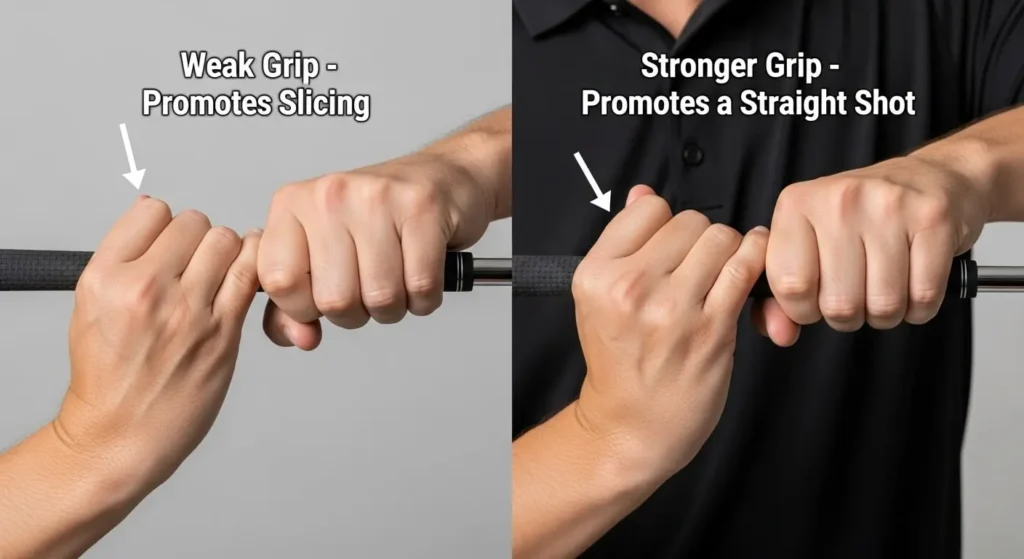
Step 1: The Grip – Your First Line of Defense
Your grip is your steering wheel. If it’s not right, you’ll never be able to control the clubface and hit the ball straight consistently. Most beginners who slice have what’s called a “weak” grip.
How to Fix It:
- Check Your Left Hand (for right-handed players): Place your left hand on the club. When you look down, you should be able to see at least two, preferably three, knuckles. The “V” formed by your thumb and index finger should point towards your right shoulder. This is a “stronger” grip, and it makes it much easier to close the clubface through impact.
- Adjust Your Right Hand: Now, place your right hand on the club. The “V” formed by your right thumb and index finger should also point towards your right shoulder.
- Grip Pressure: Don’t strangle the club! On a scale of 1 to 10, where 10 is the tightest, your grip pressure should be around a 4 or 5. Too much tension restricts your ability to release the club properly.
Pro Tip: For golfers who struggle to feel the correct hand position, a simple tool like the [SKLZ Golf Grip Trainer] can be invaluable. It clips onto your own club and forces your hands into the perfect position, helping you build muscle memory much faster.
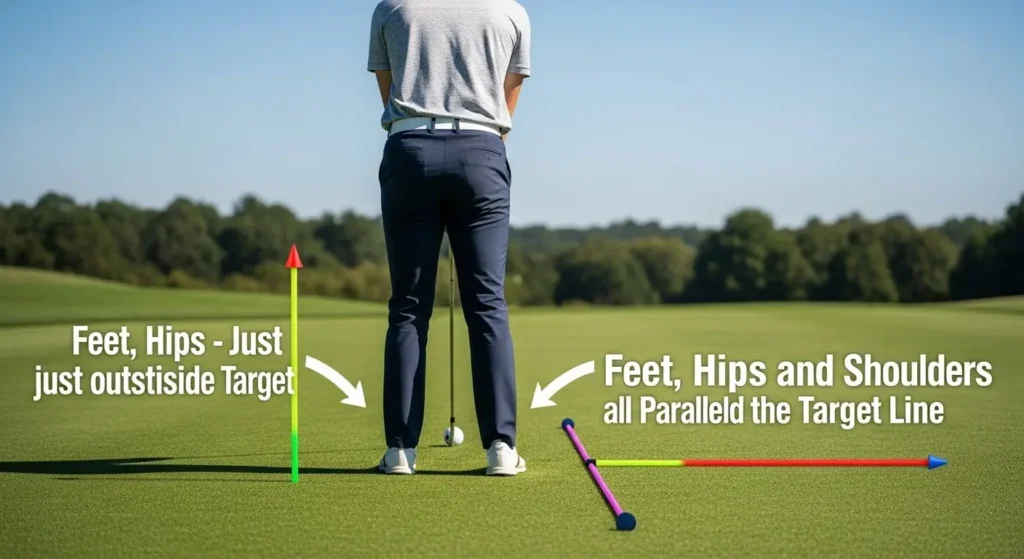
Step 2: The Setup – Building a Slice-Proof Foundation
Your stance and alignment dictate your swing path. If you’re aimed incorrectly, your body will instinctively make compensations that often lead to a slice.
How to Fix It:
- Ball Position: With a driver, you want to hit the ball on the upswing. To do this, place the ball just inside your front foot’s heel (your left heel for right-handers). This promotes a better angle of attack.
- Stance Width: Your feet should be slightly wider than your shoulders. This provides a stable base for a powerful swing.
- Body Alignment: This is a huge one. Your feet, hips, and shoulders must be parallel to your target line. A common mistake is aiming the feet correctly but opening the shoulders to face the target. This pre-sets an out-to-in swing path.
To practice this, I always recommend using golf alignment sticks. In my opinion, they are the most cost-effective training aid in golf. A set like the [GoSports Alignment Sticks] provides instant visual feedback on the range, ensuring your body is aimed for success before you even swing. Place one stick on the ground pointing at your target, and another parallel to it, just inside your feet, to create a “railroad track.”
Step 3: The Swing – Taming the Out-to-In Path
With a solid grip and setup, we can now work on the swing itself. Our goal is to replace that “out-to-in” slice swing with a powerful “in-to-out” motion.
How to Fix It:
- The Takeaway: Start your backswing “low and slow.” Imagine you’re dragging the club head straight back along the target line for the first 12-18 inches. This prevents you from immediately taking the club outside.
- The Top of the Swing: At the top, make sure you’re not “aiming left.” A common fault is to point the club towards the left of the target at the top of the backswing, which again encourages that over-the-top, out-to-in motion.
- The Downswing Feeling: This is where you fix the path. From the top of your swing, feel like you are dropping the club inside and swinging out towards the ball. A great thought is to try and hit the inside-back quarter of the golf ball.
This feeling will be strange at first, but it’s the key to changing your swing path and eliminating the slice.
For more detail on mastering your setup, check out our full guide on [Proper Golf Stance and Grip for Driving the Ball Straight].
Simple Drills to Ingrain Your New Swing and Fix That Slice
Knowing what to do is one thing; making it a habit is another. Here are a couple of my favorite drills to make that in-to-out swing path feel natural.
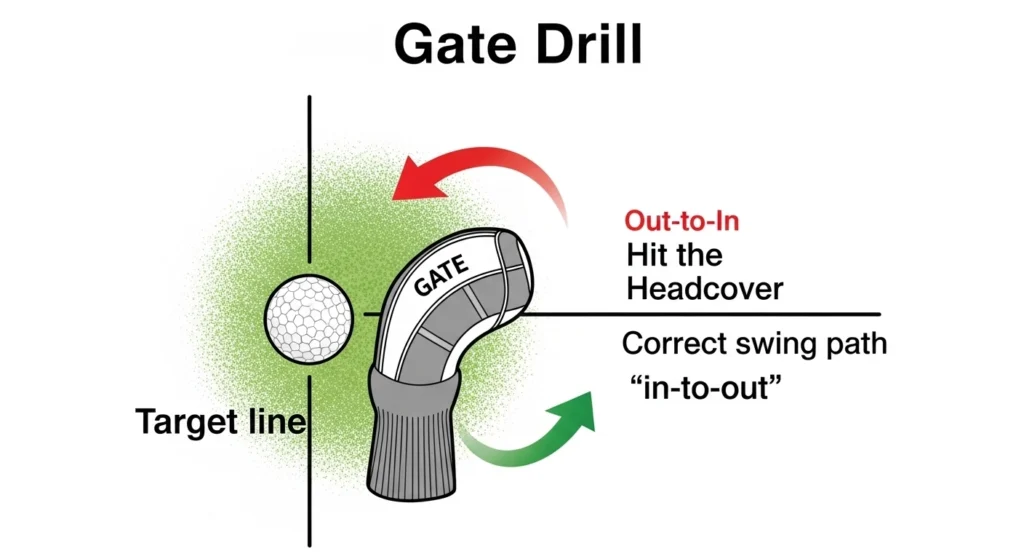
Drill 1: The Gate Drill
This drill provides incredible feedback. Place your ball as normal. Then, place your driver’s headcover (or another soft object) about six inches outside and six inches behind your ball.
Your goal is simple: swing and miss the headcover.
If you swing with your normal out-to-in path, you’ll hit the headcover on your downswing. To miss it, you are forced to drop the club to the inside, promoting the correct swing path. Start with slow, half-swings and build up to full speed.
Drill 2: The Closed Stance Drill
This is another simple but effective way to promote an inside path. Set up to the ball as you normally would. Then, drop your back foot (your right foot) about 4-6 inches away from the target line.
This closed stance makes it physically difficult to swing over the top. It forces you to approach the ball from the inside, giving you the feeling of a proper, draw-biased swing path. Hit a bucket of balls with this stance on the range to build the right muscle memory.
Frequently Asked Questions (FAQ)
Yes, to some extent. A driver with too little loft or a shaft that is too stiff for your swing speed can make a slice worse. However, in my experience, over 95% of slices are caused by the golfer’s technique, not the equipment. I recommend fixing the swing first before spending money on a new driver.
The driver is the longest club with the least amount of loft. This combination magnifies any swing flaws. The shorter shaft of an iron is easier to control, and the higher loft helps reduce side-spin.
Slowing down can help you feel the correct positions and sequence, especially when practicing new drills. However, a slow swing is not a permanent fix. The goal is to correct your technique so you can swing with confident speed and power.
This depends on how much you practice. For some, the feeling clicks in one range session. For others, it might take a few weeks of consistent practice to overwrite old habits. Be patient with yourself and focus on making small improvements each time. For further reading on swing mechanics, the experts at Trackman University’s article on “Club Path offer great data-driven insights.
Final Thoughts: Your Path to Straighter Drives
Fixing a slice is a rite of passage for almost every beginner golfer, and it’s a challenge you can absolutely overcome. By focusing on the three pillars—a stronger grip, proper alignment, and an in-to-out swing path—you will transform that frustrating banana ball into a powerful, straight drive.
Don’t try to fix everything at once. Head to the range and work on one step at a time, starting with your grip. Once that feels comfortable, move on to your setup and then incorporate the drills. With a little practice and patience, you’ll be standing on the tee box with confidence, watching your ball sail right down the middle of the fairway.
Now that your drives are flying straight, make sure you’re using the right equipment for your game by reading our [A Guide on Choosing the Right Golf Balls].
What’s the one tip from this guide you’re excited to try? Share your experience in the comments below!